A Developer's Guide to Solana Wallet Adapter with Next 13 and Practical Examples Included
I. Introduction
Are you ready to elevate your Next 13 application to new heights? Dive into this comprehensive guide that unveils the power of the Solana Wallet Adapter. From installing essential packages to troubleshooting integration challenges, I'll walk you through every step. Discover how to seamlessly incorporate wallet buttons and implement transactions with Solana's cutting-edge features. As I explore fetching NFTs and delve into the intricacies of the code structure, you'll gain practical insights for a smoother and enriched development experience. Let's begin!
II. Installing the Wallet
A. Installation of necessary packages
To kickstart the integration of the Solana mover into our Next 13 app, the first step involves installing the necessary packages. Follow the example provided below, and execute the following command in your terminal. You have the flexibility to choose between npm or yarn for installation:
This command will ensure that the required packages, including the Solana wallet adapter base, React components, and web3.js, are added to your project's dependencies. Once this step is complete, you'll be ready to proceed with further integration efforts.
B. Setting Up Wallet Component
After successfully installing the required packages, the next step is to create a file to house the wallet component. Following the example, you can copy the provided wallet code (from Jordans example) and create a file, for instance, named "wallet.tsx." Choose a suitable location, such as the "components" or "source" directory.
Next, paste the copied wallet code into "wallet.tsx." Once the wallet component is ready, incorporate it into your app's page. For instance, if you wish to display the wallet as soon as the game is loaded, include the wallet component in the appropriate section of your code. Ensure that it is triggered when the game state is set.
Upon attempting this integration, you might encounter a "type children has no properties" error. To address this, ensure that the necessary "children" property is added to the code, as demonstrated in the example. This adjustment should enable seamless integration of the wallet component into your Next 13 app.
C. Troubleshooting Integration Issues
1. Module not found: Can't solve “better-sqlite3”
Upon initiating the integration process, you may encounter an error stating "sqlite not found." To address this issue, consider switching from the unsafe burner wallet to the Phantom wallet. However, note that there might be a temporary problem when importing the Phantom wallet adapter directly from the adapter bullets. Instead of importing the Phantom wallet adapter from the adapter bullets, directly reference the Phantom wallet adapter.
This adjustment aims to circumvent the current bug and aligns with the use of the Phantom wallet for improved functionality. While you may encounter a "file-not-found" error upon reloading the app, rest assured that this is expected and has been addressed. Now, you should have a functional wallet ready for use in your Next 13 app.
2. Addressing Component Placement Challenges
In the process of integrating the Solana Adapter into your Next 13 app, you might encounter challenges related to component placement. The wallet component cannot be directly placed within your React component due to the need for a specific hook-out structure. Firstly, refer to the guidance provided by the wallet, which suggests that your app's component needs to be nested within the wallet connection provider.
In the context of Next 13, structure this differently by placing the children within the layout. Utilize the React Children Props pattern to define props in the wallet and pass them to the layout, in which i’ll show you below.
D. Adding Props
To facilitate the integration of the Solana mover into your Next 13 app, you'll need to manage props and children effectively within your components.
In your wallet component, handle props appropriately and include the necessary children. Adjust the component to incorporate props and manage children. You’ll need to add any required props to the wallet component, then utilize the `{children}` syntax to ensure the proper rendering of child components.
In your layout component, integrate the wallet component by passing children and any required props. Modify the layout component to accommodate the wallet:
- Include the wallet component within the layout.
- Pass any required props to the wallet component.
- Ensure that the `{children}` are correctly placed within the wallet.
To address potential errors related to server components (for example "Can't use client components in server components”), add a "used client" tag at the top of your wallet component. This tag designates the component as a client component, allowing for smooth rendering.
By following these steps, you'll establish a structure that handles props and children effectively, paving the way for successful integration of the Solana Wallet Adapter into your Next 13 app.
E. Adding buttons
To enhance the functionality of your Solana mover integration within the Next 13 app, you may want to incorporate wallet buttons for a seamless user experience. First, import the necessary wallet buttons from `@solana/wallet-adapter-react-ui` into your page. This includes the `WalletMultiButton` and `WalletDisconnectButton`.
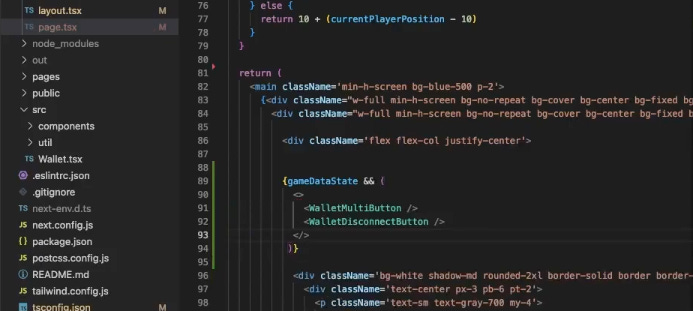
Instead of using the `Wallet` component, replace it with the `WalletMultiButton` and `WalletDisconnectButton` in your page. Update your page code to include these buttons:
Reload your app, and you should observe the wallet buttons (`WalletMultiButton` and `WalletDisconnectButton`) on your page. Users can now easily connect and disconnect, contributing to a more user-friendly Solana mover integration within your Next 13 app.
F. Implementing transaction buttons using Tailwind CSS
To enhance the visual appeal of your transaction buttons within the Solana mover integration, let's use Tailwind CSS for styling.
Tailwind CSS Utilities: Leverage Tailwind CSS to style your buttons. You can use the following code as a reference:
Ensure to include the appropriate class names based on your preferred color scheme and button style. You can replace or incorporate the styled button in your Next 13 app. For instance, you can include it in your page component where the "Restart Game" functionality is desired.
Create the `restartGame` function to handle the restart functionality. Ensure to associate it with the button's `onClick` event.
Customize the `restartGame` function to meet the specific requirements of your Solana mover integration. The outcome will look like this:
III. Implementing Transactions with Solana Wallet Adapter in the Solana Cookbook
In this part, you'll need to copy the existing transaction logic, as illustrated below, which includes creating a new transaction, obtaining the latest blockhash, and adding specific instructions based on the desired functionality (e.g., restarting the game).
Ensure that you have the necessary instructions (e.g., `createPullLeftInstruction`, `createPullRightInstruction`, `createInitializeInstruction`, `createRestartInstruction`) defined or imported as needed.
A. Extracting public key from the wallet adapter
1. Configure Wallet Adapter in Solana Cookbook
First, refer to the Solana Cookbook to understand how to extract the public key from the wallet adapter. The cookbook suggests utilizing the connection and the public key from the wallet.
Copy the necessary imports and configuration code for the wallet adapter from the Solana Cookbook into your project.
2. Integrate Public Key into Transaction Logic
Once you have the public key from the wallet adapter, incorporate it into your existing transaction logic. Modify the `SendInstructionViaWalletAdapter` function to utilize the obtained public key:
Ensure that the `publicKey` is properly checked for `undefined` before proceeding with the transaction. This modification allows you to use the public key obtained from the wallet adapter in your Solana mover integration.
B. Setting up the transaction with program ID, keys, data, and blockhash
1. Import Necessary Dependency
Copy and integrate the transaction instruction code that sets up the keys, program ID, data, and other parameters. This code is crucial for preparing the transaction
Include this import at the beginning of your file to access the required Solana and wallet-related functionalities.
2. Set Up Transaction with Program ID, Keys, Data, and Blockhash
Modify the `RestartGame` function to include the transaction instruction for restarting the game. Ensure that the program ID, keys, and other parameters are appropriately configured.
Customize the keys and program ID according to your specific game requirements.
3. Handle Potential Errors
Check for the existence of the public key before proceeding with the transaction. If the public key is undefined, you may choose to return or handle the error as needed. This step ensures that the transaction is only executed when the required public key is available, preventing potential issues.
D. Sending the transaction using the `sendTransaction` method
Now that we have set up the transaction, the next step is to send it using the `sendTransaction` method provided by the Solana wallet adapter. Utilize the `sendTransaction` method to send the prepared transaction to the Solana network. The example below demonstrates how to send the transaction and confirm its processing status:
Ensure that these lines are included within your `RestartGame` function, following the setup of the transaction.
By expanding the functionality with more providers, such as the backpack and others like Global, Solar Flare, and more, users can enhance their app's capabilities effortlessly. This versatility makes the wallet adapter a valuable tool for developers seeking straightforward integration in Next 13.
IV. Practical Example: Get NFTs in Solana Wallet with Code & Wallet Adapter
A. Interacting with the Solana Blockchain
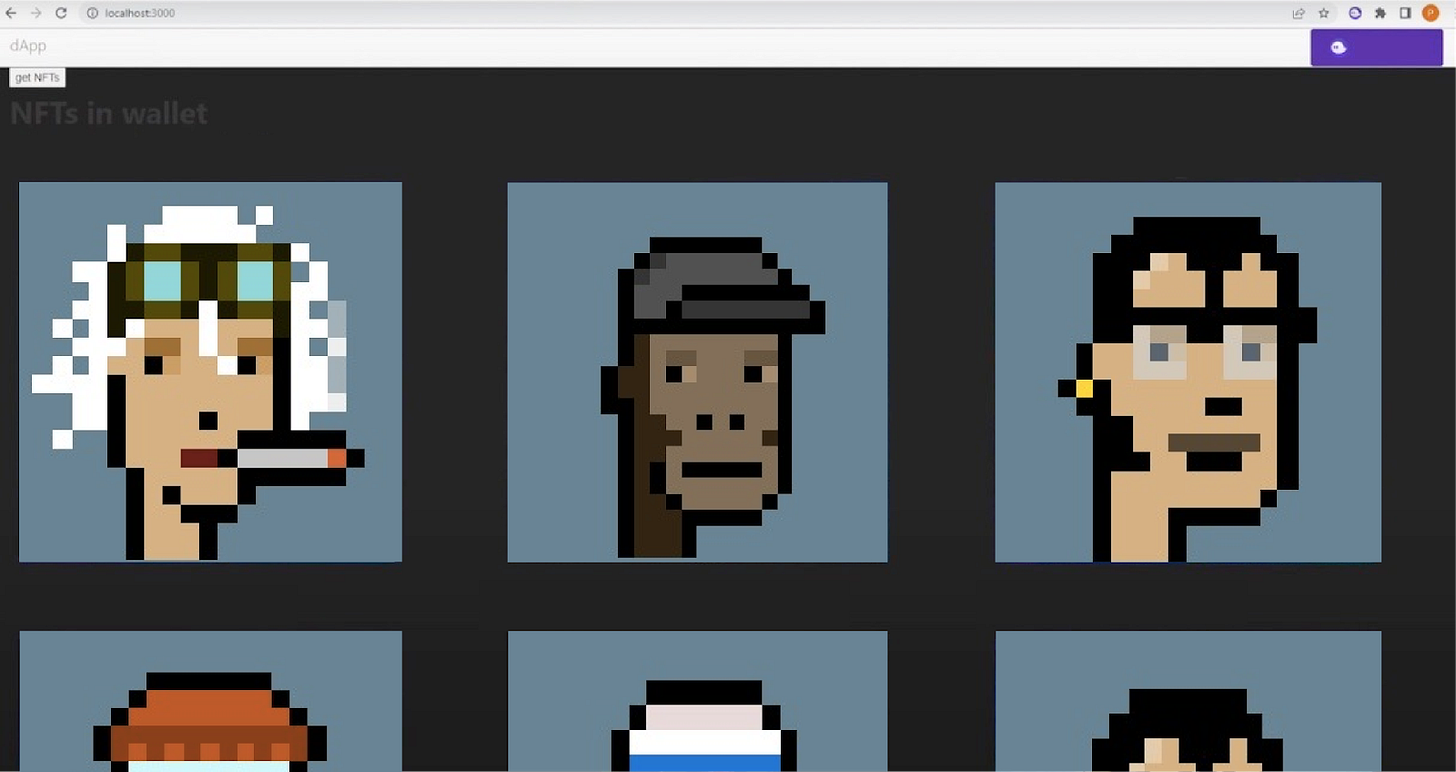
To begin interacting with the Solana blockchain and fetching NFTs using the Wallet Adapter, you’ll need to launch your browser and navigate to your localhost using port number 3000, where your Solana app is running. Within the app, locate and select the wallet section. Here, you'll find support for various wallets. Note that the NFTs are stored in a wallet address that uses Phantom for connection.
Open your Phantom wallet and navigate to the "Collectibles" section. You should observe the NFTs stored in this wallet address. For instance, there are NFTs in the demonstration.
Click on "Select Wallet" to initiate the connection process. Follow the prompts to connect your Phantom wallet to the Solana app. Once connected, click on the "Get NFTs" button within the app. The application will count the number of NFTs.
B. Understanding the Code Structure
Now, let's delve into the code to comprehend how this React application utilizing the Solana Wallet Adapter is structured. The code snippet starts with the rendering of the React application using `ReactDOM.render()`. The application's root component, `<App />`, is rendered within the `<React.StrictMode>` wrapper.
The code also imports various dependencies essential for wallet integration, connection handling, and styling.
Wallet adapters from the `@solana/wallet-adapter-wallets` package are imported, representing various supported wallets. These adapters include Phantom, Slope, Solflare, Torus, Ledger, Sollet Extension, and Sollet.
The code establishes a connection to the Solana blockchain using `Connection` from `@solana/web3.js`. Additionally, it sets up some initial values, including the program ID for SPL tokens. Additionally, the code imports `Metadata` from the Metaplex foundation and defines an array (`tokensInWallet`) to store information about tokens in the wallet. Finally, the code includes CSS styles for the application and the Solana Wallet Adapter UI components.
Within the `Context` component, we set up context providers for the Solana wallet adapters and the connection to the blockchain.
- `network`: Specifies the Solana network (mainnet in this case).
- `endpoint`: Defines the RPC endpoint based on the selected network.
- `wallets`: Configures an array of supported wallet adapters.
- The `Context` component wraps the `ConnectionProvider`, `WalletProvider`, and `WalletModalProvider`, ensuring proper initialization of wallet-related functionalities.
The `App` component serves as the entry point, encapsulating the entire application within the `Context` provider and rendering the `Content` component.
The `Content` component handles blockchain interaction, including initializing the connection and providing functions for retrieving tokens owned by a specific wallet address.
- `const connection = new Connection("https://api.mainnet-beta.solana.com");`
- Initializes a connection to the Solana blockchain, specifying the mainnet-beta network.
- `async function getTheTokensOfOwner(MY_WALLET_ADDRESS: string) {`
- Async function responsible for retrieving tokens owned by a specific wallet address.
- Uses `getParsedProgramAccounts` from the Solana `Connection` class to interact with the blockchain.
- The function takes the wallet address as a parameter (`MY_WALLET_ADDRESS`) and queries the token program accounts.
Utilizes filters, including data size and memcmp (memory compare), to narrow down the search for token accounts associated with the provided wallet address.
Continuing with the code breakdown, after obtaining the accounts for each token, the next steps involve processing and displaying relevant information. Let's examine the code:
In this segment, the code iterates through each token account retrieved. For each account, it checks if the token amount is equal to 1, indicating an NFT. If so, it increments the `totalNFTsI` counter, logs details such as Token Account Address, Mint, and Amount, and pushes an object representing the NFT into the `tokensInWallet` array.
Finally, the total count of NFTs is logged, and a dynamic element (`nfts_total_element`) is created to display the total count. This element is then rendered in the HTML, updating the total NFT count dynamically.
Now, let's explore the `getAccountMetaData` function.
In this function, it takes the mint address, token amount, and a number as parameters. It creates a mint public key, retrieves the token meta public key, and loads metadata using the Metaplex `Metadata` class. The metadata, including name and URI, is then updated in the `tokensInWallet` array. Additional logic or processing related to metadata can be added as needed.
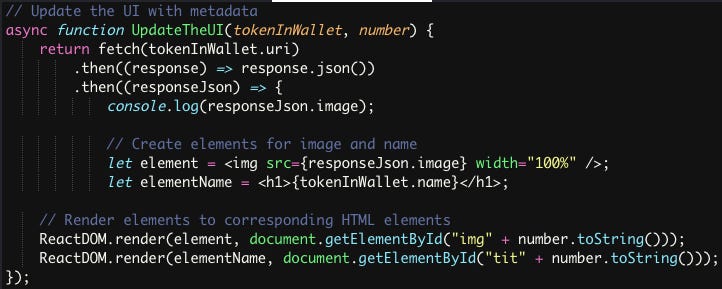
Now, let's delve into the functionality of the `UpdateTheUI` function, which facilitates the dynamic rendering of NFT metadata on the user interface. This asynchronous function fetches data from the URI, enabling the display of images and names, enhancing the user experience in the Solana blockchain application.
In this code, the `UpdateTheUI` function fetches metadata from the URI and updates the UI by rendering the image and name elements to specific HTML elements. This helps dynamically display the information associated with each NFT on the application.
In the next code snippet, an asynchronous callback (`onClick`) is defined for the "Get NFTs" button. It checks for a connected wallet, logs SOL balance, and fetches NFTs using `getTheTokensOfOwner`.
In this part, a click event (`onClick`) is defined as an asynchronous callback function. When the "Get NFTs" button is clicked, this function is triggered. It checks if there is a connected wallet (`publicKey`), logs the SOL balance, and then calls the `getTheTokensOfOwner` function to retrieve NFTs owned by the wallet.
Now, let's discuss the HTML structure
This HTML structure includes a Bootstrap-based navbar, a button to trigger the NFT retrieval, and a container for displaying NFT information. The NFTs are displayed in rows with three items each, and for each NFT, there's a placeholder for the title (`tit0`) and image (`img0`). The total count of NFTs is dynamically updated in the heading.
C. Future expansion plans for pagination
As the Solana blockchain and NFT ecosystems continue to evolve, future plans for enhancing the application's functionality include implementing a robust pagination system. Pagination will allow users to seamlessly navigate through their extensive collection of NFTs, ensuring a smoother and more efficient user experience. By extending the current capabilities, users will have the flexibility to explore and manage a larger number of NFTs stored in their wallets, catering to the diverse and expanding landscape of digital assets on the Solana blockchain. Stay tuned for updates as I strive to optimize and enrich the NFT browsing experience within the Solana application.
VII. Conclusion
In closing, the integration of Solana Wallet Adapter in Next 13 development paves the way for a revolutionary user experience. Overcoming challenges, implementing transactions, and styling with Tailwind CSS are just glimpses into the vast capabilities offered. The future holds promise with plans for a dynamic pagination system, ensuring your app evolves seamlessly alongside Solana's thriving ecosystem. As you embark on this transformative journey, armed with newfound knowledge, embrace the boundless possibilities and watch your Next 13 app flourish on the Solana blockchain. Happy coding!


